5 Tips for Easier Editing in Microsoft Word
Despite the rise of competitors, Microsoft® Word remains one of the most powerful word processing programs in use by graduate school programs. It’s filled with formatting, editing, and collaborative features, many of which you may not know about.
Unless you’ve taken a course on Word, there are likely a number of functions you are under-utilizing or completely unaware of simply by not having used them before. I know, when I graduated and started working professionally on a much larger number of reports and journal articles, it was eye-opening to learn of all the features I had unwittingly overlooked (thank you, copyeditors, you taught me so many things!).
So, if you are looking for more efficient, effective, and easier editing, I’ve written 5 tips for editing in Microsoft® Word that you may never have heard of.
5 Easier Editing Tips
While Word won’t make writing your thesis or dissertation any easier, there are some tricks to make editing easier, and anything that makes life easier is great in graduate school. Here are four tips for better editing in Word.
1. Easier Editing Using Find and Replace
Found directly at the end of the Home ribbon, Find and Replace is a popular function that you’ve likely heard about. However, did you know that Find and Replace can find a lot more than words and short phrases?
One of my favorite uses for Find and Replace is to find and remove errant spaces. It may be an occasional slip of hitting the space bar more than once, or you might have collaborated with someone old-school who kept adding two spaces after the period, or you might have cut and pasted from another source, inadvertently adding multiple spaces. Regardless, it’s rare that a larger document doesn’t end up with an extra space here and there. You can use Find and Replace to fix this issue.
To do it, open up the replace window and put two spaces in the ‘Find What’ line, then put a single space in the ‘Replace with’ line. Click on ‘Replace All’ and the program will replace double spaces with single ones. Run this a couple of times, until Word finds no double spaces to change all multiple spaces to single ones.

There are actually a lot of embedded functions within the Find and Replace windows. Clicking on the “More > >” button in the lower left corner will open a variety of powerful search functions. Want to find “Place” but not “Replace”? Open the advanced search functions and select ‘find whole words only.’ ‘Wildcard’ and ‘Find all word form’ searches can be used when you want to find all variations of a word. You can even search by formatting.
2. Customize Spellcheck
Many students rely on Word’s built-in dictionary and spellcheck for easier editing. However, most don’t know how to customize their settings to use these tools efficiently. When is the last time you customized your spellcheck and dictionary settings?
First, go to the File tab and select “Options” (at the bottom of the left sidebar). This will bring up a new window. In the left sidebar, find the tab for Proofing. This will bring up many options that may be relevant to you. Pay particular attention to the checkbox that tells Word to Ignore words in UPPERCASE. This is a default setting so that Word doesn’t flag acronyms. However, it also means any typos you make in words using capital letters (e.g., in a running head) are not being proofed, and if you make a typo in an acronym, it also won’t be detected. I have lost track of the number of papers with typos in the running head because students were relying on spellcheck to catch them.

This brings me to the next feature. If you commonly make a mistake typing a word, you can instruct Word to auto-correct it by clicking on the button at the top for AutoCorrect Options… This brings up a new window with several tabs relevant to auto-correction for graduate students. This is one of my favorite things. I have stubborn fingers that like to type words in a specific way, even though I know they are spelled differently. My fingers have a mind of their own. So, instead of constantly having to go back and fix these typos, I can make editing easier by specifying that Word auto-corrects them for me. To create an auto-correct, type the misspelling under Replace. Under With type the correct spelling and then click Add. From then on, Word will edit the typo automatically. This is also helpful if there is an embarrassing close letter substitution common in your field (e.g., Public Health accidentally typed as Pubic Health or Mental being accidentally typed as Metal).
3. Writing for the Masses with Readability Checks
Not all writing in graduate school is geared towards faculty and the highly educated. Sometimes you’ll find yourself writing for broader audiences. Whether it’s a blog post, an information pamphlet, or a report geared to the general public, it’s important to write to your audience. Moreover, sometimes simpler writing is clearer writing. When you are communicating difficult concepts, even in academic literature, the writing style should not detract from the message. Sometimes this means unlearning the tendency to write complex, confusing sentences using pretentious language that you picked up in high school English class.
Being a good writer means knowing when to use a simpler word (almost always) and when to use a more complex one. If you want to get better at writing overall and better at writing to a general audience, Word has tools to help. Under the Proofing tab, you’ll find an option at the bottom that says “Show readability statistics.” Checking this box will add additional output when you run a manual spellcheck. For example, if I wanted to get the readability statistics for the first paragraph of this section, I would highlight the paragraph and select Spelling & Grammar under the Review tab. Since there are no spelling or grammatical errors detected in that paragraph, I get a pop-up that asks if I want to review the rest of the document. I select: ‘no’ because I am only interested in that paragraph. This brings up this display:
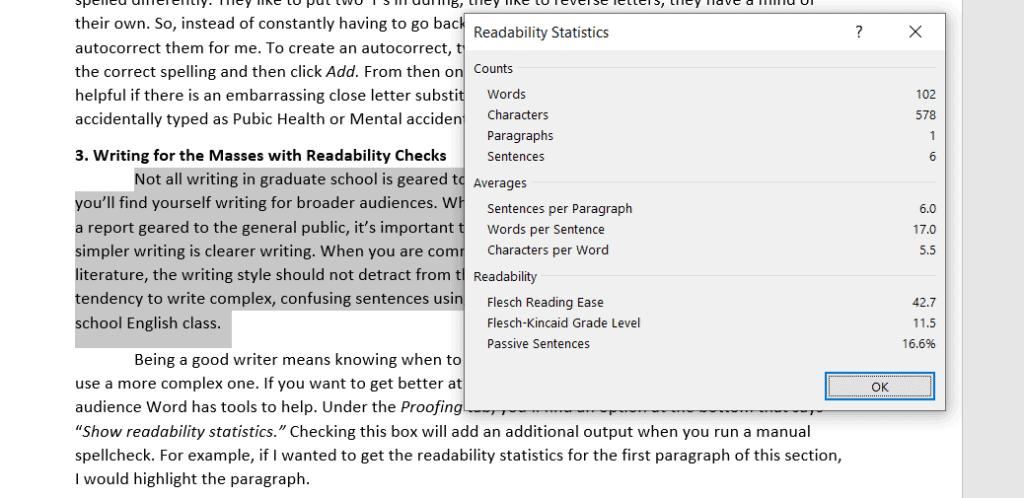
This display shows my readability statistics for that paragraph. From this, I can look at the average number of words per sentence. Fewer words per sentence lead to a lower reading level (think how short the sentences in a Dick and Jane reader are). It’s not just the number of words; longer sentences tend to be more complex due to the sentence structure (combining clauses with commas, etc.). Good writing at any level combines longer and shorter sentences and avoids convoluted sentence structure.
Looking at the next section, I can see three markers of readability. The first two are interrelated and give an approximate difficulty score. The highlighted paragraph is written at an approximate grade level of 11.5. Since this blog is focused on graduate students, that’s fine with me. However, if this were for a general audience, I’d be inclined to edit the paragraph for a lower reading level. The final measure of readability is the number of sentences I wrote in the passive voice. Passive voice is a bad habit that many of us have adopted through poor instruction in high school and college English classes (no offense to the teachers who teach otherwise, but I think you are in the minority). Passive voice is when the object of a sentence becomes the subject. Passive voice is not a grammatical error. There is nothing inherently wrong with writing in the passive voice, but like all things, overuse can cause a problem. A small percentage of passive voice sentences can add depth and variability to the writing style. Overuse, however, can increase the reading difficulty and be a sign of overly complex sentence structure.
The paragraph highlighted is 16% passive voice. Since it’s a short paragraph, that works out to be one sentence, the very first sentence: Not all writing in graduate school is geared towards faculty and the highly educated. If I wanted to rewrite it to not be passive, it would read something like this: Faculty and the highly educated are not always the audiences for your writing in graduate school. Both sentences are, but I like the original better. I think it flows nicer, and I’m writing for a highly educated audience. However, if I were writing for a more general audience, then that entire paragraph would need revision.
Writing for a general audience has a few rules: choose shorter words, use shorter sentences, use transitional phrases (good advice regardless of the audience), and simplify the sentence structure. While it can be a challenge to explain complex concepts to a general audience, following these rules will help you get there. You can use the readability statistics as a general guideline to make editing for your audience easier (remember it is not a perfect measure. It’s a general reflection on how complex the writing is).
4. Easier Editing and Collaboration with Track Changes
Are you working collaboratively? Providing feedback on someone else’s work? Turn on Track Changes. This feature allows you to suggest edits in a way that the lead author can easily review and accept or reject with just a click of a button. There are two reasons to use Track Changes.
First, when you are editing another person’s work, sometimes, despite your best efforts, you can inadvertently change the meaning of what the author was trying to communicate. Often this is due to a misunderstanding of the author’s intent or, through the oversimplification of important nuance. Using Track Changes allows the primary author to review your edits and accept, reject, or refine them based on their best judgment.
The second reason to use Track Changes is to show your reviewers (particularly if you are making edits to your paper based on a faculty member’s feedback) that you’ve been responsive to their comments. Often, after the second or third draft, faculty and reviewers are only interested in reviewing your response to their feedback and suggestions. Track Changes lets them rapidly identify your edits, saving them time, and saving you the work of drafting a response to them (Note: Track Changes is not a substitute for drafting a Response to Reviewers when publishing in peer-reviewed journals. Sorry, you’ll still have to write that one).
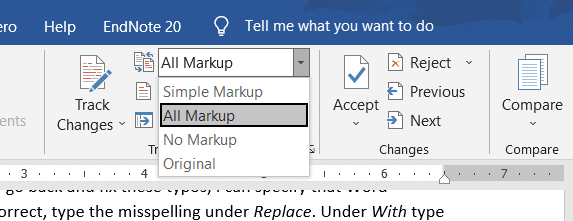
You can find Track Changes under the Review Ribbon. There are a lot of options under Track Changes that are not immediately apparent. If you find the extra markup of track changes distracting, you can change the settings to continue to use Track Changes but change the display so that it doesn’t show the changes by selecting No Markup. When Track Changes is on and No Markup is selected, Word is tracking the changes but displays the document as it would look if all changes were accepted. Then, any author can turn on the markup display to review the edits. Other options include displaying All Markup, which will display detailed changes, or Simple Markup, which shows where a change has been made but does not display the exact change. I found that after a short period of working with Track Changes, I preferred to see All Markup.
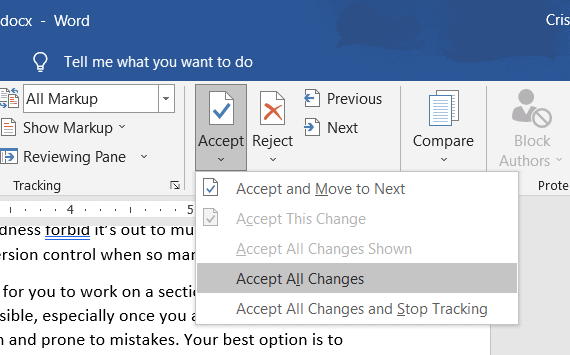
Once you are used to seeing changes, you’ll appreciate how much easier it is to navigate to areas of your paper that you need to edit. Instead of going back to review areas of text over and over again, or scrolling through pages until you find the edits, you can quickly navigate to each change using the Changes pane, which is right next to the options to turn on Track Changes. You can easily accept changes that you like, reject changes that you don’t, and move quickly between changes using the Previous and Next buttons.
5. Better Version Control Using Compare/Combine
Version control is the bane of every graduate student’s existence. You send your thesis or dissertation to your advisor for feedback, but you can’t sit around twiddling your thumbs waiting for them to get back to you. You need to continue writing. But that means your faculty is reviewing an old draft from the get-go, and editing that becomes a nightmare. Once they send it back to you, you’re going to have to resolve changes in the new version, which might not quite line up with the old one anymore. Goodness forbid it’s out to multiple reviewers at once! What’s a student to do? How do you maintain version control when so many people have input?
There’s no easy solution to this, but there are ways to make editing easier. The cleanest would be for you to work on a section of the paper that no one else is reviewing, but that’s not always possible, especially once you are further into the process. Manually combining multiple versions is a pain and prone to mistakes. Your best option is to use the Compare tool in Word to combine multiple versions into a single document, which tracks discrepancies and allows you to review them and decide on what to keep and what to discard.
Found under the Review ribbon, right next to the Track Changes, the Compare tool can be a bit tricky to use at first, but are invaluable for version control. There are two options. Compare and Combine, both of which function similarly, with only a slight difference. Compare allows you to look at changes across two documents. Let’s say you sent out a version of your paper to a co-author who wasn’t savvy enough to use Track Changes, and now you need to review their edits. You can use the Compare tool to designate the original version and have Word indicate all deviations in the edited version for you to review.
Combine allows you to combine multiple edited versions of a document and evaluate discrepancies across versions. Most importantly, Word tracks which version these changes came from, allowing you to know who authored which changes. Combining documents has to be done in pairs. One document is designated as the original and must not contain any tracked changes. The second document is the revised document and can contain tracked changes. If you are combining edits from multiple coauthors, you can do it in one of two ways. First, combine one coauthor’s feedback with your working document, review and accept or reject changes, save it as a new version, then combine the next author’s. Or, you can combine multiple edited pairs. For example, let’s say there are three authors: you, Alex, and Sam. First, choose Alex or Sam’s version as an ‘original’ and accept all changes and save (you don’t need to review these changes, that comes later, for now just ‘Accept All’ under the Changes pane.
Combine that original with the other co-author’s paper. This new version has Alex and Sam’s feedback combined. Now, take your original version (make sure there are no unaccepted Track Changes. In this case, you do need to review and accept the changes). Then combine it with the document that has Alex and Sam’s feedback. The new version will show your original with both Alex and Sam’s suggested changes.
How’s that for easier editing?!
Also, check out my series on digital organization and version control, so you can stop problems before they start.